| 일 | 월 | 화 | 수 | 목 | 금 | 토 |
|---|---|---|---|---|---|---|
| 1 | 2 | 3 | 4 | 5 | ||
| 6 | 7 | 8 | 9 | 10 | 11 | 12 |
| 13 | 14 | 15 | 16 | 17 | 18 | 19 |
| 20 | 21 | 22 | 23 | 24 | 25 | 26 |
| 27 | 28 | 29 | 30 | 31 |
- 정보처리기사 2024
- 리네이미지랜더링
- 이미지랜더링
- css 초기세팅
- 프리랜서 양식
- 리네renderIndicator
- nextjs 설치
- 목표정하기
- 정보처리기사
- 리네이미지
- 리네 뒤로가기
- 금액안내서
- react typescript eslint
- react eslint
- 리네 안드로이드
- eslint setting
- react prettier setting
- react typescript eslint prettier
- 금액안내서 양식
- react plugin setting
- 재공학
- 프리랜서 금액안내서
- 리네 안드로이드 뒤로가기
- 안드로이드뒤로가기
- nextjs 시작
- nextjs 설치하기
- react-native-image-progress
- css 초기화하기
- 프리랜서 견적서
- react-native-fast-image
- Today
- Total
hello! Mingure
[React Native] react-native-splash-screen 사용법 본문
앱 처음 켜질 때 나타나는 랜딩페이지 같은게 splash screen 이다. 안드로이드와 IOS 각각 세팅해야한다. 그리고, 리네가 0.70으로 업데이트 되면서 또 기존 블로그 내용과 달라지는 부분도 있어서 해당 부분은 내 다른 포스팅 참고하면 된다.
https://hellomingure.tistory.com/32
[React Native] SplashScreen 에러 : MainActivityDelegate cannot be converted to Activity SplashScreen.show(this);
이번 리네 프로젝트 Splash Screen 작업하다가 발견한 이슈. 이 전 프로젝트에서 쓰던대로 그대로 splash screen 설치해서 작업하는데................ yarn add eact-native-splash-screen https://github.com/crazycodeboy/react
hellomingure.tistory.com
https://github.com/crazycodeboy/react-native-splash-screen
GitHub - crazycodeboy/react-native-splash-screen: A splash screen for react-native, hide when application loaded ,it works on iO
A splash screen for react-native, hide when application loaded ,it works on iOS and Android. - GitHub - crazycodeboy/react-native-splash-screen: A splash screen for react-native, hide when applicat...
github.com
1. 라이브러리 설치
yarn add react-native-splash-screen2. 안드로이드 세팅하기
1. app/src/main/res/layout (layout 폴더가 없으면 폴더를 만들면 된다.)에 launch_screen.xml 파일 만들기고 아래 코드 넣기.
**
android:src="@drawable/launch_screen" 이 경로에 있는 파일을 사용한다고 생각하면 된다.
<?xml version="1.0" encoding="utf-8"?>
<RelativeLayout xmlns:android="http://schemas.android.com/apk/res/android"
    android:orientation="vertical" android:layout_width="match_parent"
    android:layout_height="match_parent">
    <ImageView android:layout_width="match_parent" android:layout_height="match_parent" android:src="@drawable/launch_screen" android:scaleType="centerCrop" />
</RelativeLayout>
2. app/src/main/res/drawable 폴더에 background_splash.xml 만들기
<?xml version="1.0" encoding="utf-8"?>
<layer-list xmlns:android="http://schemas.android.com/apk/res/android">
    <item
        android:width="300dp"
        android:height="300dp"
        android:drawable="@drawable/launch_screen"
        android:gravity="center" />

</layer-list>
3. app/src/main/res/drawable- 모든 폴더에 launch_screen.png 파일 넣어주기
https://www.appicon.co/#image-sets 여기 사이트로 가서 splash 이미지로 사용 할 사진 넣으면 자동으로 사이즈별로 generage함.해당 파일 다운받아서 사이즈별로 하나씩 폴더에 이미지 명 launch_screen로 해서 넣어주기!
- drawable-ldpi
- drawable-mdpi
- drawable-hdpi
- drawable-xhdpi
- drawable-xxhdpi
- drawable-xxxhdpi
4. app/src/main/java/com/내 패키지 이름/MainActivity.java 파일 수정하기
import android.os.Bundle;// 이 코드 추가하기
import org.devio.rn.splashscreen.SplashScreen;// 이 코드 추가하기


public class MainActivity extends ReactActivity {

// ---- 이 부분 코드 추가하기
  @Override
    protected void onCreate(Bundle savedInstanceState) {
        SplashScreen.show(this, true);
        super.onCreate(savedInstanceState);
  }
// ----여기까지
  /**
   * Returns the name of the main component registered from JavaScript. This is used to schedule
   * rendering of the component.
   */

  @Override
  protected String getMainComponentName() {
    return "내 앱 이름";
  }
  .
  .
  .
}
3. IOS 세팅하기
ios는 비교적 간단함.
1. Xcode 에서 내 프로젝트 ios 폴더채로 그냥 불러오기
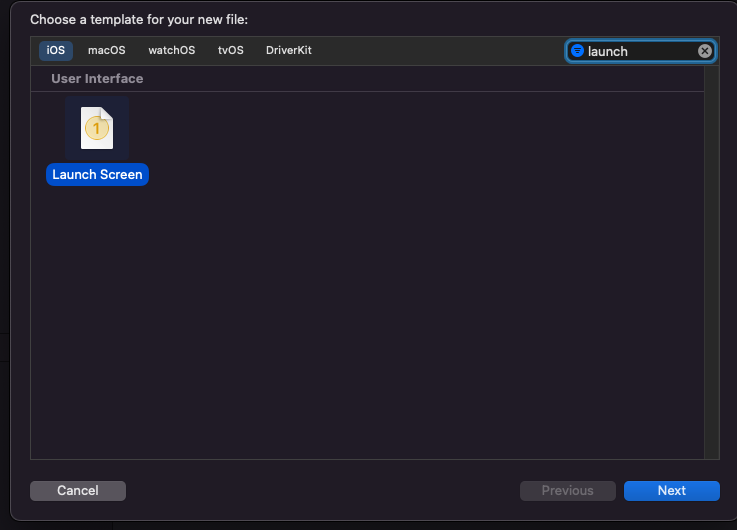
2. 왼쪽 바 project navigator 에서 프로젝트 폴더 > 프로젝트 폴더로 들어와서 마우스 우클릭 > new file > launch screen 선택 > next > launch screen 적용할 프로젝트 선택 > 확인 하면
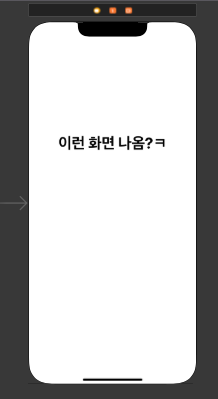
오른쪽 화면같은게 뜰거임. 여기에 안드로이드 splash screen 디자인과 동일하게 구성하면 끝!


'React Native' 카테고리의 다른 글
| [React Native] useIsFocused 란 무엇인가 (0) | 2022.12.29 |
|---|---|
| [React Native] react-native 안드로이드 뒤로가기 BackHandler (0) | 2022.12.28 |
| [React Native] react-native-image-progress 사용하기 (0) | 2022.12.22 |
| [React Native] SplashScreen 에러 : MainActivityDelegate cannot be converted to Activity SplashScreen.show(this); (0) | 2022.12.19 |
| [React Native] 0.68.x Android build failure issue (0) | 2022.11.07 |


